DolphinMPS Troubleshooting Instructions
| Polarity Intensity | Low Intensity | Medium Intensity | High Intensity |
| Negative (-) | Light will stay OFF | Light will Blink | Light will Blink |
| Positive (+) | Light will Blink | Light will Blink | Light will Blink |
| Biphasic (+/-) | Light will Blink | Light will Blink | Light will Blink |
- If the ear clip extension (Black wire) is falling off on its own:• Try cleaning the cone of the unit and the cap of the ear clip extension (Black Wire) with an alcohol wipes to remove any residue that can cause the probe to fall off on its own.• If the ear clip extension (Black Wire) is brand new, it can be a little tight but after using it a couple of times it will become okay and fit the unit perfectly. Install the wire on the unit, twist it multiple times and uninstall the wire, do this multiple times until the base of the wire fit the unit perfectly
- To Check if the Black wire (Ear Clip Extension) is working:
- Remove all accessories
- Attach the black wire (no ear clip) to the tip of the unit
- Turn on the unit and change the sensitivity to Dry
- Touch the ground metal plate with thumb
- Touch the metal pin of the black wire with finger tip
- Check if the sound changed to high pitch and the light to go off
- If it does, the black wire is working fine
- To Check if the Ear clip is working:
- If the above Black wire (Ear Clip Extension) is working
- Attach the ear clip on the black wire (Ear Clip Extension)
- Touch the ground metal plate with thumb
- Touch the ear clip with finger tip
- Check if the sound changed to high pitch and the light to go off
- If it does, the ear clip is working fine
- To Check if the oval pad and white wire (wire connector) are working:
- Remove all accessories
- Attach the oval pad on the ground metal plate
- Attach the white wire to the oval pad
- Turn on the unit and change the sensitivity to Dry
- Touch the unit metal tip with finger tip
- Touch the metal pin of the white wire with another finger tip
- Check if the sound changed to high pitch and the light to go off
- If it does the oval pad and white wire is working fine
- If not try to change the oval pad with a new one to see if that is the issue
- To Check if the large rectangular pad is working:
- If the above white wire (wire connector) is working
- Attach the large rectangular pad on the white wire (wire connector)
- Touch the unit metal tip with finger tip
- Attach the large rectangular pad below belly button
- Check if the sound changed to high pitch and the light to go off
- If it does the large pad is working fine
Note: The #1 reason for return is a low charged battery only. Please try to change the battery with a quality alkaline 9 volts battery or if you have a working unit, swap the battery with that and see if it works.
If the device is not turning “ON”, please double check if the battery is installed on the right polarity by following the sign on the battery compartment.
Dolphin Neurostim (Patient) Battery Test
When the unit is turned “ON”, press battery test button (located at the bottom-front of the unit) this will indicate the battery strength and determine if it needs replacement. When the battery test button is pressed (with the unit on) and light does not glow, it is time to change the battery.
Test the battery light every few weeks.

Note: The #1 reason for return is a low charged battery only. Please try to change the battery with a quality alkaline 9 volts battery or if you have a working unit, swap the battery with that and see if it works.
If the device is not turning “ON”, please double check if the battery is installed on the right polarity by following the sign on the battery compartment.
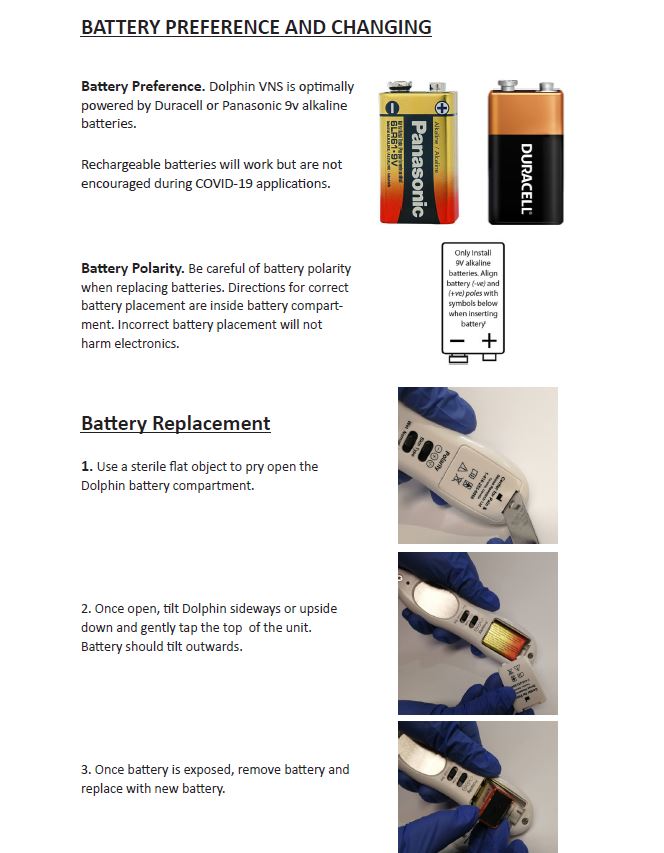
Dolphin Professional Battery Test
When the unit is turned “ON”, the indicator light at the back of the unit will also indicate battery strength and determine if it needs replacement. When the unit is “on” you should hear a buzzing sound and the indicator light should glow. If the light does not glow, it is time to change the battery.
| Polarity Intensity | Low Intensity | Medium Intensity | High Intensity |
| Negative (-) | Light will stay OFF | Light will Blink | Light will Blink |
| Positive (+) | Light will Blink | Light will Blink | Light will Blink |
| Biphasic (+/-) | Light will Blink | Light will Blink | Light will Blink |
•The indicator light will blink during treatment and silent mode but will stay off when the unit is on the negative and low-intensity setting.
• If the indicator light is not turning ON but you can hear the sound, please follow the battery test instructions above.
• Press the silent/ continuous button to activate the function, holding the button will not activate the function.
• A low charged battery can also cause the silent/ continuous function to not work properly.
• If the silent/continuous button is not always activating, try to slightly rotate the button and see if it works.
If the extension probe is falling off on its own:
• Try cleaning the cone of the unit and the cap of the extension probe to remove any residue that can cause the probe to fall off on its own.
• If the extension probe is brand new, it can be a little tight but after using it a couple of times it will become okay and fit the unit perfectly.
If having difficulty finding points, try changing the sensitivity to dry and try to locate a point at the back of your neck to test.
The scratchy or low audible sound can be a cause of a low charged battery only. Please try to change the battery with a quality alkaline 9 volts battery or if you have a working unit, swap the battery with that and see if it that fixes the scratchy sound.
For Dolphin Professional:
The beep reminder also works when the sound is turned back on. You will notice that there is also a reminder when the sound is on, it will sound like the buzzing sound will drop or have a scratchy sound. This is the reason why the timer goes off at intervals of less than 25 seconds.
For example, if you turn the sound back on when the timer is around 15 seconds, then turn the sound off again around 20 seconds, then you will hear the “beep” reminder after 5 seconds. The timer does not reset to (0) zero when you turn OFF the sound, it will continue where it left off.
For Stimulation and Point Finding Issue Please follow the steps below:
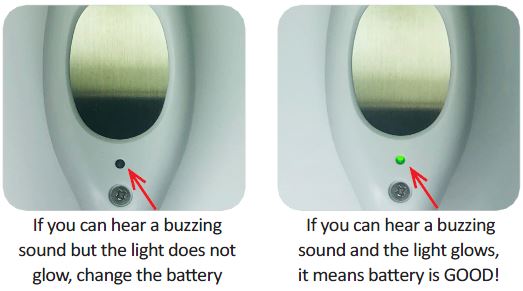
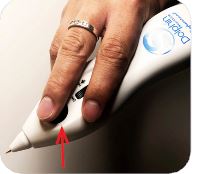
- Hold the Dolphin properly.
The Dolphin produces electrical current and therefore human skin must be touching the metal plate during point location/stimulation for grounding purposes. The Dolphin is designed to be held like a pen with the thumb firmly placed on the ground plate and the index/middle finger wrapped around and gripping the top of the unit.

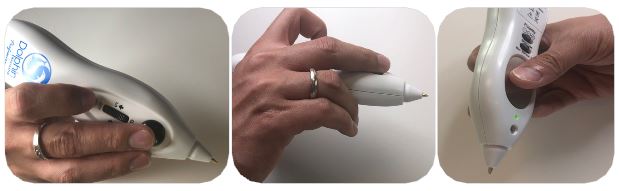
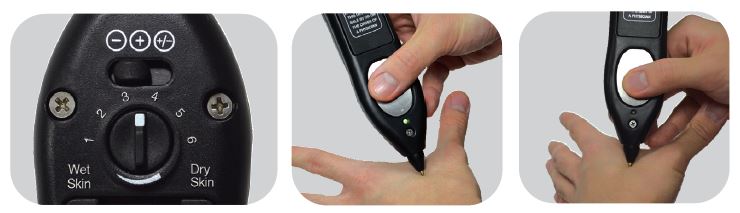
- Point Location & Using the Sensitivity Dial/ Slider to Assist in Location
The point indicator light is located above the ground plate on the top of the back of the unit. This light, which turns bright green when the unit is turned on, will flicker “off” when a point has been successfully located. Difficulty locating points often means dry skin, so rotate/ slide the sensitivity dial/ slider to “Dry” to increase sensitivity. Finding too many points often means moist skin, then rotate/ slide the sensitivity dial/ slider to “Wet” to decrease sensitivity.

- How Much Pressure to Apply During Point Location

- Treatment Button:
The activation/treatment button is located on top of the unit in front of the wheel. Once a point has been successfully located, press and hold the treatment button for 20-30 seconds, or 20-30 “beeps.”

- Silent & Continuous Mode Button (for Dolphin Professional only):
The silent & continuous mode button is the small button is located on top of the unit in the back of the wheel. Once a point has been successfully located, press the silent button, the device will become silent and produces an on-going continuous stimulation. An audible reminder “beep” will emit every 25 seconds on this mode. Treat a point for 20-30 seconds or 20-30 “beeps.”

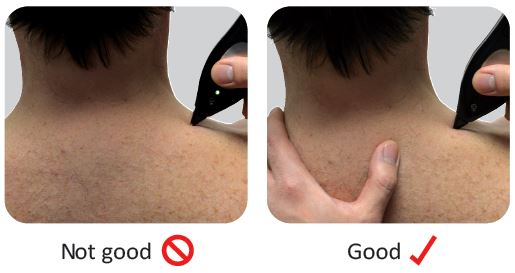
- Treating Someone Else:
Using the same hand positioning as above to hold the unit, touch the skin of your patient with the opposite hand (see “good” below) to ground and locate points.

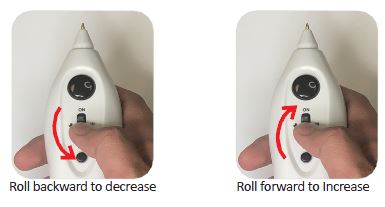
- Increasing/Decreasing Strength of Stimulation/Current:
Wheel permits for increasing/decreasing of the output current strength. Rolling wheel forward turns unit on, where it is on the low setting. Continued rolling forward increases strength. There is no difference therapeutically between high or low, just patient preference at to what “feels right”. Many therapists believe optimal outcomes are achieved when you start on low and then roll the wheel forward during application until the Dolphin “beeps”.

Dolphin Neurostim (Patient) Parts Location

- Metal Tip
The metal tip is roughly the same size as the tip of a ballpoint pen and is rounded at the tip for a gentle application. When you treat yourself with the Dolphin Neurostim, press the metal tip gently against your skin to administer the microcurrent into your soft tissue. - Treatment Button
When the treatment button is pressed, it emits the flow of DC microcurrent from the unit and through the metal tip. - On/Off Switch and Intensity Dial
This feature serves dual purposes. First, the dial turns the unit off and on (indicated by the unit emitting a high pitched tone). Second, it increases or decreases the intensity of the microcurrent stimulation. For example: if you wanted to increase the intensity, you would scroll up (or forward), and if you wanted to decrease it, you would scroll down (or backward). Stimulation is largely a matter of personal comfort, but we recommend that you start low and increase as needed. - Battery Test Button
The battery test button lets you know if your unit’s battery is working properly, or needs to be replaced. With the unit on, press down on this button to get an indication of the battery strength. If the light does not illuminate brightly, then that means you need to replace the battery. - Indicator Light
This light is activated when the Dolphin Neurostim™ unit is switched on and is used to indicate when you have found a treatment point. When you’re using the unit and the light flickers off, that means that a point has been located. - Ground Plate
The Dolphin Neurostim™ produces electrical current and therefore, human skin must be touching the ground plate, during point location and stimulation. The Dolphin Neurostim™ is designed to be held like a pen with thumb firmly placed on the ground plate and index/middle finger wrapped around and gripping top of the unit. - Sensitivity Dial
The Sensitivity Dial assists in an accurate point location. The Dolphin Neurostim™ locates trigger points by measuring changes in skin resistance, which is influenced by moisture. Normal skin should have the dial pointing upwards between 3-4 (12 o’clock). - Polarity Switch (Tonify (+), Disperse (-), Biphasic (+/-))
The polarity switch is found at the bottom/back of the unit. Negative (-) is like applying an ice pack, positive (+) is like applying a heat pack. The default setting is negative for most treatment points. Biphasic (+/-) is used for balancing the nervous system. - Battery Compartment
The Dolphin Neurostim™ is optimally powered by a high-quality Alkaline 9V battery.
Dolphin Professional Parts Location
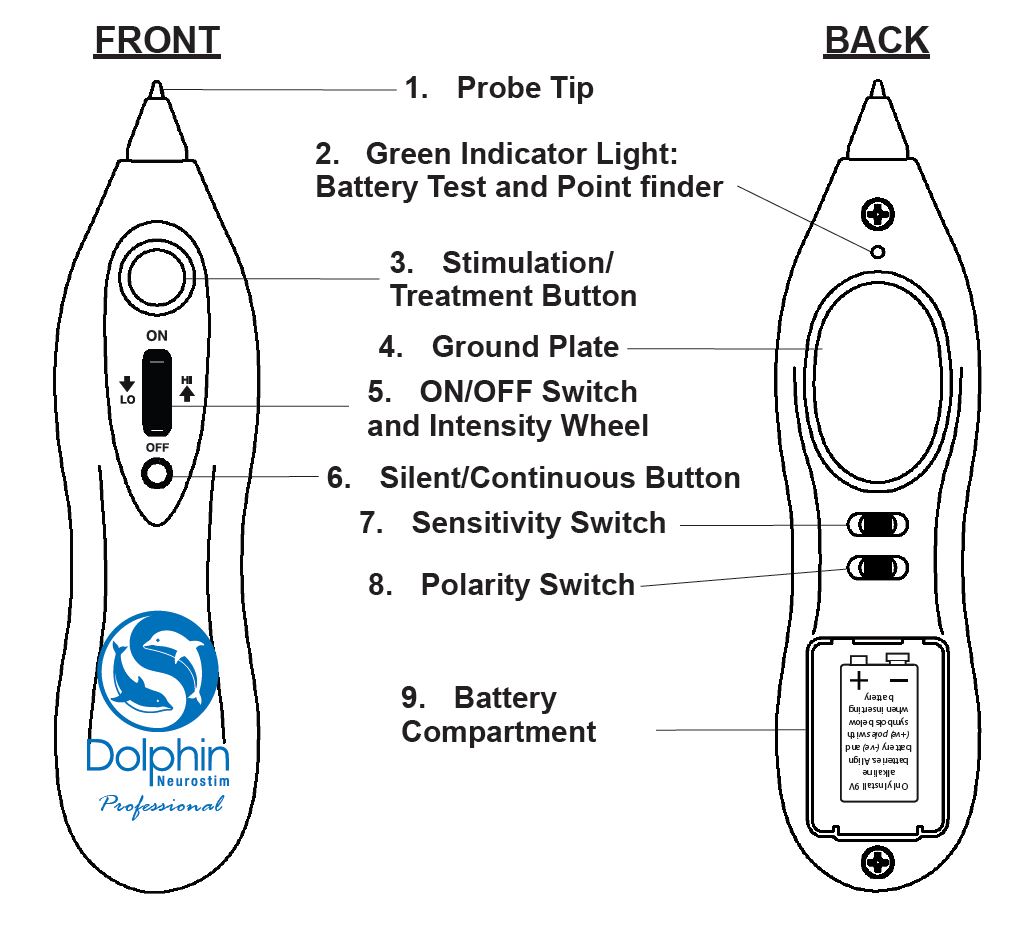
- Probe (Metal tip):
The metal tip is roughly the same size as the tip of a ballpoint pen and is rounded at the tip for a gentle application. When you treat yourself with the Dolphin Neurostim, press the metal tip gently against your skin to administer the microcurrent into your soft tissue. - Green Indicator Light:
This light is activated when the Dolphin Professional unit is switched on and is used to indicate when you have found a treatment point. When you’re using the unit and the light flickers off, that means that a point has been located.- Battery Test Light:
This new feature indicated battery strength if light DOES NOT illuminate when turned on, change the battery.
- Battery Test Light:
- Stimulation/ Treatment Button:
When the treatment button is pressed, it emits the flow of DC microcurrent from the unit and through the metal tip. - Ground Plate:
The Dolphin Professional produces electrical current and therefore, human skin must be touching the ground plate, during point location and stimulation. It is designed to be held like a pen with thumb firmly placed on the ground plate and index/middle finger wrapped around and gripping top of the unit - ON/OFF switch and Intensity Wheel
This feature serves dual purposes. First, the dial turns the unit off and on (indicated by the unit emitting a high pitched tone). Second, it increases or decreases the intensity of the microcurrent stimulation. For example: if you wanted to increase the intensity, you would scroll up (or forward), and if you wanted to decrease it, you would scroll down (or backward). Stimulation is largely a matter of personal comfort, but we recommend that you start low and increase as needed.
- Silent/Continuous Button:
Pressing this button silences the device and produces an on-going continuous stimulation. For White tip unit – An audible reminder “beep” will emit every 25 seconds in this mode. For Blue tip unit – The device will automatically turn off the silent and continuous treatment cycle after 12-15 minutes and go back to search mode.Notice: When using the Dolphin Neurostim for Vagal Stimulation, please set a separate timer on your phone or alarm clock as the unit’s timer varies. - Sensitivity dial:
The Sensitivity Dial assists in an accurate point location. The Dolphin Professional locates trigger points by measuring changes in skin resistance, which is influenced by moisture. Select the appropriate skin type during treatment. - Polarity Switch:
The polarity switch is found at the bottom/back of the unit. Negative (-) is like applying an ice pack, positive (+) is like applying a heat pack. The default setting is negative for most treatment points. Biphasic (+/-) is used for balancing the nervous system. - Battery Compartment: Dolphin Neurostim is optimally powered by a high-quality Alkaline 9V battery.